Mastering Witch 3D SVG Multilayer Cutting Files for Enchanting Home Decor
Creating dimensional wall art has become one of the most rewarding trends in modern crafting, blending traditional aesthetics with digital precision. At the heart of this movement is the Witch 3D SVG Multilayer Cutting Files design, a sophisticated digital asset that transforms flat materials into striking, shadow-rich decor. Whether you are preparing for Halloween or simply wish to add a touch of gothic elegance to your year-round interior, understanding how to leverage these multilayered files can elevate your projects from simple cutouts to professional-grade masterpieces.
The appeal of 3D layered designs lies in their ability to create depth without requiring complex assembly skills. However, achieving a polished result requires more than just hitting "cut." It demands an understanding of material behavior, machine capabilities, and design scaling. This guide explores how to maximize the potential of the Witch 3D SVG, ensuring your final piece is both structurally sound and visually captivating.
Understanding the Design Structure and Dimensions
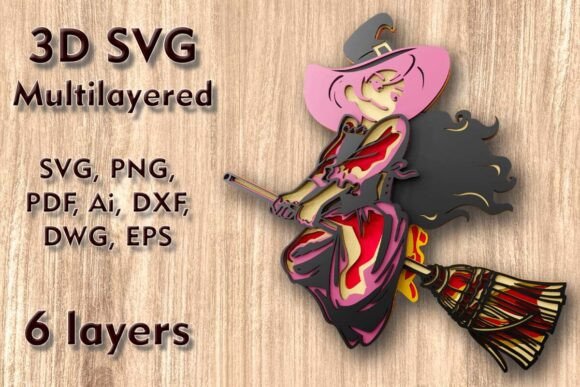
The Witch 3D SVG Multilayer Cutting Files are engineered with precision in mind. The base design measures 250 x 238 mm (approximately 9.9 x 9.4 inches). This specific footprint is ideal for standard home decor spaces, fitting perfectly above mantels, on entryway tables, or as part of a larger gallery wall. One of the significant advantages of vector-based designs like this is scalability. You can easily increase the size to create a statement piece for a large living room wall.
However, crafters must exercise caution when reducing the design. The artwork consists of six distinct layers, each containing intricate details such as fine lines, delicate curves, and thin connecting elements. When you shrink the overall dimensions, these thin elements may become too fragile to survive the cutting process or the weeding stage. If you plan to downsize the project significantly, it is crucial to preview the design at 100% zoom to ensure that no lines merge or disappear, which could compromise the structural integrity of the final piece.
Material Selection for Optimal Results
Versatility is a key feature of the Witch 3D SVG Multilayer Laser Cutting Files. The design is compatible with a wide range of materials, including plywood, paper, cardstock, MDF, wood, acrylic, cardboard, and even aluminum. Your choice of material will drastically alter the aesthetic and durability of the final product.
- Plywood and MDF: These are the top choices for permanent wall art. They provide rigidity and a natural texture that enhances the 3D effect through shadow play. Light-colored plywood allows for easy painting or staining after assembly.
- Cardstock and Paper: Ideal for greeting cards, gift tags, or temporary decorations. Using heavy-weight cardstock ensures the layers hold their shape without bending.
- Acrylic: For a modern, sleek look, acrylic offers a glossy finish and vibrant color options. It is particularly effective for catching light, adding a dynamic element to the witch motif.
- Aluminum: Advanced users with CNC capabilities can use thin aluminum sheets for an industrial, metallic finish that is incredibly durable.
When working with organic materials like wood or paper, remember that thickness matters. Ensure that the combined height of your six layers does not make the piece too bulky for your intended display method. Spacers or foam tape can be used between layers to enhance depth if the material itself is thin.
Compatibility with Cutting Machines
One of the primary concerns for crafters is whether their specific equipment can handle the file. The Witch 3D SVG Multilayer Cutting Files are designed to be universally compatible. Upon purchase, you receive a ZIP folder containing SVG, layered SVG, DXF, DWG, EPS, AI, PNG, and PDF formats. This comprehensive suite ensures that regardless of your hardware, you have the right file type.
Cricut and Silhouette Users: If you are using a blade-based cutter, the SVG and layered SVG files are your best friends. These formats preserve the cut paths and allow you to assign specific colors to each of the six layers, making it easy to organize your mat layout. Use a fine-point blade for cardstock and a deep-cut blade for thicker materials like balsa wood or heavy cardboard.
Laser Cutter and CNC Owners: For those with Glowforge, xTool, or industrial CNC routers, the DXF, DWG, and AI files provide the precise vector data needed for clean cuts. Laser cutting is particularly effective for this design because it seals the edges of wood and acrylic, preventing fraying and ensuring crisp details in the intricate mandala-style patterns of the witch design.
Practical Applications and Creative Ideas
The versatility of the Witch 3D SVG Multilayer Cutting Files extends beyond simple wall hangings. Here are several ways to integrate this design into your crafting repertoire:
- Statement Wall Art: Assemble the six layers using strong adhesive or small brads for a rustic look. Mount the finished piece on a contrasting background color to make the silhouette pop.
- Illuminated Decor: Incorporate LED strip lights behind the middle layers. The gaps between the intricate cutouts will allow light to filter through, creating a magical, glowing effect that highlights the depth of the design.
- Custom Greeting Cards: Scale the design down and use high-quality cardstock. The layered effect adds a luxurious, handmade feel to Halloween invitations or birthday cards for friends who love mystical themes.
- Gift Toppers and Ornaments: Create smaller versions to use as unique gift tags or holiday ornaments. The durability of wood or acrylic makes these keepsakes that can be reused year after year.
Tips for Assembly and Finishing
Assembly is where the magic truly happens. With six separate layers, alignment is critical. Start by laying out all your cut pieces in order. It is highly recommended to dry-fit the layers before applying any adhesive. This allows you to check for any warping in the material and ensure that all tabs and slots align correctly.
Use a low-tack adhesive spray or double-sided foam tape for easier positioning. Foam tape is particularly useful as it naturally creates spacing between layers, enhancing the 3D illusion without requiring manual spacers. If you are using wood, consider sanding the edges lightly before assembly for a smoother finish. Painting or staining should ideally be done before assembly to ensure full coverage of all nooks and crannies, although a final topcoat after assembly can unify the look.
Conclusion
The Witch 3D SVG Multilayer Cutting Files offer a perfect blend of artistic flair and technical accessibility. By understanding the nuances of scaling, material selection, and machine compatibility, you can transform a digital file into a tangible piece of art that captivates viewers. Whether you are a seasoned CNC operator or a Cricut enthusiast looking to expand your skills, this design provides the tools needed to create enchanting, professional-quality decor. Embrace the complexity of the six-layer structure, experiment with different materials, and let your creativity bring the mystical charm of the witch motif to life in your home.