Crafting Depth with Lily Multilayer Laser Cut Files
The transition from flat, two-dimensional crafting to immersive three-dimensional art marks a significant leap in creative expression. For makers who have mastered the basics of cutting vinyl or simple paper shapes, the next frontier is depth, shadow, and layering. This is where Lily Multilayer Laser Cut Files become an indispensable resource. Designed specifically for precision cutting machines, this digital asset allows crafters to produce sophisticated wall decor that commands attention through its intricate geometry and organic elegance.
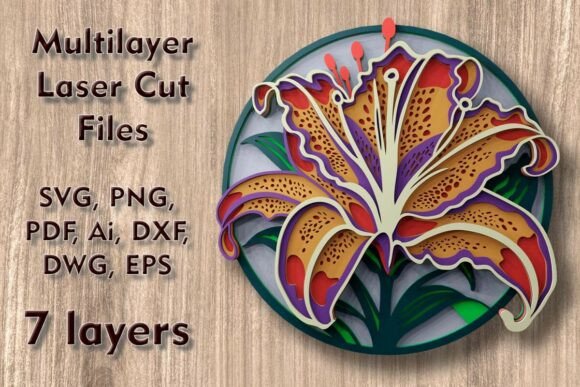
Unlike standard single-layer designs, this project relies on the strategic stacking of seven distinct layers. Each layer contributes to the overall visual narrative, creating shadows and highlights that change depending on the viewing angle and lighting conditions. Whether you are using a desktop laser cutter like a Glowforge, a CNC router, or even a blade-based machine like a Cricut or Silhouette for paper crafts, understanding how to manipulate these layers is key to achieving a professional finish.
Understanding the Design Architecture
The core appeal of the Lily design lies in its balanced complexity. With a base dimension of 240 x 240 mm (9.45 x 9.45 inches), the file offers a substantial canvas for detail without becoming unmanageable. The design consists of seven separate layers, each meticulously engineered to interlock visually. When assembled, these layers form a lush, blooming lily that appears to float off the backing board.
One of the most critical technical aspects to consider is scalability. While the provided size is ideal for medium-sized wall art or tabletop centerpieces, the vector nature of the files means you can easily increase the dimensions for larger statement pieces. However, caution is required when reducing the size. The design includes thin, delicate elements that define the petals and stamens. If you scale the project down too aggressively, these fine lines may become too fragile to cut cleanly or may break during the weeding and assembly process. Always test a small section if you plan to significantly alter the original proportions.
Material Selection and Textural Contrast
The versatility of Lily Multilayer Laser Cut Files is largely defined by the materials you choose. The digital package supports a wide range of substrates, including plywood, paper, cardstock, MDF, wood, acrylic, cardboard, and even aluminum. Your choice of material will dramatically alter the final aesthetic.
- Wood and Plywood: Using natural woods like birch plywood creates a warm, rustic look. The grain of the wood adds organic texture that complements the floral motif. Staining different layers in varying shades of brown or leaving them natural can enhance the perception of depth.
- Paper and Cardstock: For those without access to laser cutters, this design works beautifully with blade cutters. Using heavy-weight cardstock in gradient colors—from deep purples at the back to pale pinks at the front—can mimic the natural color transition of a real lily.
- Acrylic: For a modern, sleek appearance, clear or frosted acrylic layers can catch light uniquely. This approach is particularly effective for home decor that aims to feel contemporary and airy.
- MDF and Cardboard: These are excellent, cost-effective options for practicing assembly techniques or creating large-scale installations where weight might be a concern with solid wood.
When working with mixed materials, such as combining a wooden base with paper petals, ensure that your adhesive is suitable for both surfaces. A strong craft glue or double-sided tape often works best for paper-to-wood applications, while wood glue is essential for all-wood constructions.
Technical Compatibility and File Formats
Upon purchase, you receive a comprehensive ZIP folder containing multiple file formats, ensuring compatibility with virtually any cutting software. The inclusion of SVG, layered SVG files, DXF, DWG, EPS, AI, PNG, and PDF means you are not locked into a specific ecosystem.
For users of Cricut Design Space or Silhouette Studio, the layered SVG files are particularly valuable. They allow you to import the design with each layer already separated, saving hours of manual sorting. Laser cutter users utilizing LightBurn or RDWorks will find the DXF and DWG files ideal for maintaining precise vector paths. Adobe Illustrator and Inkscape users can leverage the AI and EPS files for further customization, such as adjusting node points or adding personal touches to the petal shapes.
It is important to remember that this is a digital product. No physical item will be shipped to you. This immediate access allows you to start your project instantly, but it also places the responsibility of material sourcing and cutting precision on the creator. Always perform a test cut on scrap material to dial in your machine’s power and speed settings before committing to your final substrate.
Creative Applications Beyond Wall Art
While the primary use case for Lily Multilayer Laser Cut Files is home wall decor, the modular nature of the design invites broader experimentation. Consider adapting the layers for functional objects. For instance, the individual layers can be used as stencils for painting or embroidery hoops. The negative space created by the cutouts provides a perfect guide for intricate hand-stitching on fabric.
Entrepreneurs and small business owners can leverage this design for product lines. Customizable color schemes allow for seasonal variations—think pastels for spring weddings or deep reds and greens for holiday decor. Because the file is digital, you can produce inventory on demand, reducing waste and storage costs. Additionally, the design can be scaled up to create backdrop elements for photography studios or event staging, offering a high-end look at a fraction of the cost of custom fabrication.
Educators can also utilize this project to teach principles of geometry, engineering, and art. Assembling the seven layers requires spatial reasoning and patience, making it an excellent workshop activity for older students or community art groups. It demonstrates how simple 2D shapes can combine to create complex 3D structures.
Assembly Tips for Professional Results
The difference between a good project and a great one often lies in the assembly. To ensure your Lily art looks polished, follow these practical guidelines:
- Clean Your Edges: After cutting, especially with wood or acrylic, remove any char marks or burrs. Light sanding for wood or flame polishing for acrylic can make a significant difference in the final presentation.
- Use Spacers: To maximize the 3D effect, consider using thin foam tape or small wooden dowels between layers. This creates air gaps that cast deeper shadows, enhancing the visual depth.
- Align Carefully: Use registration marks or a light box to align the layers perfectly before gluing. Once the adhesive sets, adjustments are difficult to make.
- Frame It Right: A deep-set shadow box frame is ideal for this type of art. It protects the delicate layers from dust and damage while providing a finished look that is ready to hang.
By approaching the Lily Multilayer Laser Cut Files with a mindset of precision and creativity, you unlock the potential to create enchanting decor that resonates with viewers. Whether you are a hobbyist looking to challenge your skills or a professional seeking unique design assets, this multi-layered SVG offers a robust foundation for artistic exploration. The key is to respect the material constraints, embrace the technical possibilities, and let the layered design inspire your next masterpiece.