Mastering the Veteran Bullet Layered Laser Cut for Patriotic Décor
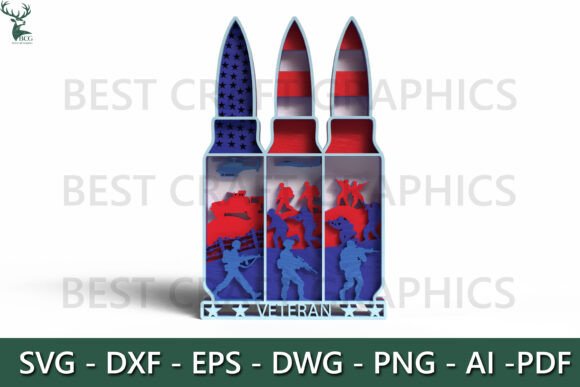
Creating meaningful patriotic art requires more than just a laser cutter and a sheet of wood; it demands an understanding of depth, symbolism, and technical precision. The Veteran Bullet Layered Laser Cut has emerged as a standout design for makers looking to honor military service with sophistication. This specific 3D layered bullet design features American soldiers, tanks, and the U.S. flag, offering a complex visual narrative that flat designs simply cannot match. Whether you are preparing for Memorial Day, Veteran’s Day, or simply enhancing your home décor with timeless symbols of freedom, this project offers a unique blend of artistic expression and technical challenge.
However, many creators rush into cutting these intricate files without fully understanding the nuances of multi-layer assembly. The difference between a professional-grade display piece and a warped, misaligned mess often comes down to preparation and material selection. By addressing common pitfalls early, you can ensure your final product honors the subject matter with the dignity and quality it deserves.
Understanding the Complexity of Multi-Layer Designs
At first glance, a layered bullet design might seem like a straightforward stack of shapes. In reality, the Veteran Bullet Layered Laser Cut is a sophisticated composition where each layer serves a specific visual purpose. The outer shell represents the bullet casing, while the interior layers reveal detailed silhouettes of soldiers and military hardware against the backdrop of the American flag. This depth creates a shadow-box effect that draws the viewer in.
A frequent misunderstanding among beginners is assuming that any vector file will work equally well for this type of project. Not all files are created equal. High-quality designs, such as those provided in clean formats like SVG, DXF, EPS, DWG, PNG, AI, and PDF, are optimized for laser cutting. They feature closed paths, proper node placement, and scalable dimensions that maintain integrity at various sizes. Using poorly constructed files can lead to gaps in cuts, overlapping lines that confuse the laser head, and ultimately, wasted material.
Material Selection Mistakes That Ruin Depth Effects
One of the most critical decisions you will make is choosing the right material. While the design works great with wood and acrylic, the choice significantly impacts the final aesthetic. A common error is using materials with inconsistent thickness. If your plywood varies even by a fraction of a millimeter across the sheet, your layers will not stack flush. This results in visible gaps or uneven pressure points when gluing, which detracts from the polished look of the piece.
For wooden projects, Baltic birch plywood is often recommended due to its uniform layers and lack of voids. However, some creators overlook the grain direction. Cutting against the grain on certain layers can cause splintering, especially on the intricate details of the soldiers and tank treads. Always align the grain consistently across all layers unless you are intentionally seeking a contrasting texture for artistic effect. For acrylic users, ensure you are using cast acrylic rather than extruded if you want crisp, flame-polished edges, though extruded may be sufficient for painted finishes.
Precision and Alignment Challenges
Assembly is where many projects fail. The Veteran Bullet Layered Laser Cut relies on precise alignment to create the illusion of a seamless 3D object. A typical mistake is relying solely on visual estimation during gluing. Without registration marks or a jig, it is incredibly difficult to keep the U.S. flag layers perfectly centered within the bullet outline. Even a slight shift can make the design look amateurish.
To avoid this, consider adding small, discreet alignment pins or tabs to your design if your software allows, or create a simple cardboard jig that holds the bottom layer in place while you stack the subsequent ones. Another overlooked detail is the type of adhesive used. Thick wood glue can squeeze out and create raised bumps that prevent upper layers from sitting flat. Use a thin cyanoacrylate (CA) glue or a spray adhesive for initial positioning, followed by minimal wood glue for permanent bonding. Apply pressure evenly using clamps or heavy books while the adhesive cures.
Scaling and Compatibility Issues
While the default size of the file is scalable, resizing is not always linear in terms of structural integrity. Shrinking the design too much can make the delicate details of the soldiers’ figures impossible to cut cleanly, leading to breakage during weeding or assembly. Conversely, enlarging the design significantly may require thicker materials to maintain the proportional depth, which your laser cutter might not be able to handle in a single pass.
Before committing to your final material, always perform a test cut on a scrap piece of the same thickness. Check the kerf width—the amount of material burned away by the laser. If the kerf is too wide, your pieces may fit loosely. Adjust your design offsets accordingly. Remember that this file is compatible with popular machines like Glowforge, xTool, and Cricut, but each machine interprets vector data slightly differently. Review your cut settings for power and speed specifically for your machine’s lens and focal length.
Licensing and Ethical Usage
Respecting intellectual property is crucial in the maker community. You may use this file for commercial or personal purposes, which opens up opportunities for small business owners and entrepreneurs to sell finished physical products. However, redistribution or resale of the digital file itself is strictly prohibited. A common ethical misstep is sharing the downloaded SVG or DXF with friends or online groups. This undermines the creator’s work and violates the license terms.
If you plan to sell the finished pieces, ensure you are marketing the craftsmanship and the physical item, not the digital design. Highlight the quality of the materials and the care taken in assembly. This approach adds value to your product and respects the original artist’s rights. Additionally, when selling patriotic items, be mindful of the context. These designs are intended to honor heroes, so maintaining a respectful presentation in your marketing and product description is essential.
Final Checks Before Cutting
Before you hit the start button on your laser, take a moment to review your file. Ensure there are no stray vectors or open paths. Check that all layers are properly grouped and labeled if your software supports it. Verify that the colors or line types correspond to the correct cut settings for engraving versus cutting. A final proofread of your setup can save hours of frustration and expensive material waste.
The Veteran Bullet Layered Laser Cut is more than just a decorative item; it is a tribute. By avoiding these common mistakes and focusing on precision, material quality, and ethical usage, you create a piece that truly honors the service and sacrifice of American soldiers. Take your time, respect the process, and let the layered depth of your work reflect the depth of gratitude behind it.